Welcome to the comprehensive guide on managing your menu within the TAPn’GO Admin panel! This article will provide you with a step-by-step approach to effectively configure and customize your restaurant’s menu, ensuring a seamless experience for both your staff and customers.
You will learn how to manage featured menu items, create and organize menu sections, set modifiers for item customization, and categorize your offerings with menu types and tags. Additionally, we’ll cover how to inform customers about allergens and provide descriptors for dietary preferences.
Iin this article you will learn:
From Your Admin Panel, Click on Menu tab so you can manage your Menu.

To add your menu to TAPn'GO, you need to follow the below steps, which will be explained in detail and Step-by-Step in the article below:
Access Menu Management: Go to the Menu tab in the Admin Panel
Create Menu Sections: Add sections, control availability, and organize the menu layout.
Set Modifiers: Create modifier groups to customize item options for customers.
Define Menu Types: Add menu types to categorize items (e.g., Lunch or Dinner).
Create Tags: Add tags to categorize and filter items and enable custom availability.
Add Allergens: Include allergens to inform customers of potential allergens in items.
Add Descriptors: Assign attributes (e.g., Halal, Gluten-Free) to items for more information.
Add Items with Details: Add items with all relevant details, such as modifiers, tags, allergens, and menu types.
Manage Featured Items: Add or organize featured items in the Featured Menu Items section.
(Could be done as last step after defining all the required details)
- To add items, click on "Add New Featured Item." The items should be predefined, as mentioned in step 2.
- This section allows you to manage the display of featured items on your menu and customize the title of the Featured section.
Example: you can add the featured items with the title" Top Seller" as shown below. - You can also choose to Auto scroll Featured Items by enabling the related button.
- You can manage ordering items and delete any items as needed within the featured menu section.
This is how the recommended items will appear in the menu

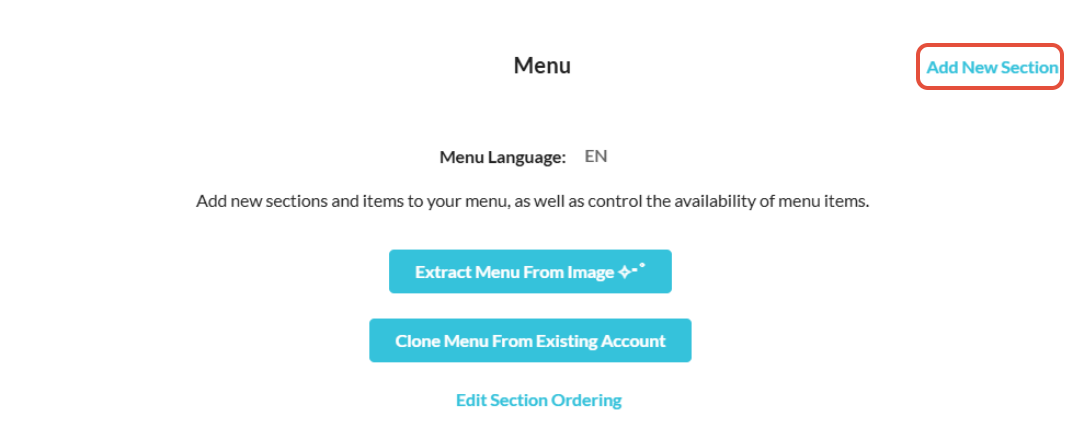
This part allows you to add new sections and items to your menu, control item availability, and organize section orders.
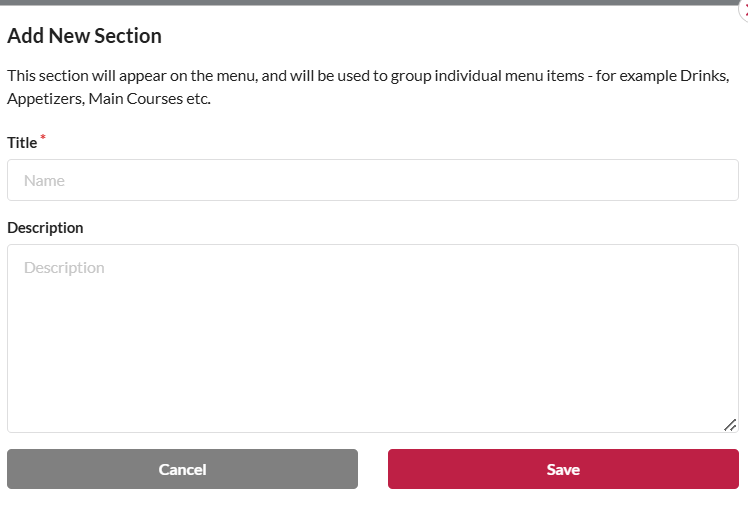
This section will appear on the menu, and will be used to group individual menu items - for example Drinks, Appetizers, Main Courses etc.
In this Section, you will be able to do:
- Set Menu Language
- Extract Menu from Image
- Add New Section
- Clone Menu from existing Account
You can click on the language to change the menu language

-You can add an image of your existing menu to extract the menu directly with no need to fill each and every item, click on Extract the menu from image to upload your image

ii. Add New Section
You can add the menu manually, by clicking on "Add New Section".
Edit/Clone Section
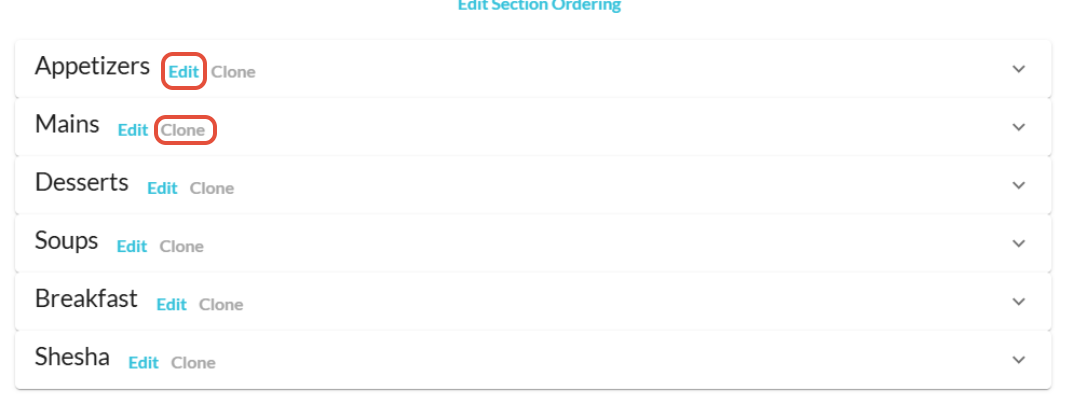
-Each section (ex. Appetizers, Mains, Desserts) can be edited or cloned to streamline menu customization.
-Click on Edit to edit each section.
Add items/ Tags /Delete section
-For each section, you can expand it to "Add items", "Add Tag", "delete" the section, "mark the section as Unavailable", and "Edit Item ordering".

Add New Item
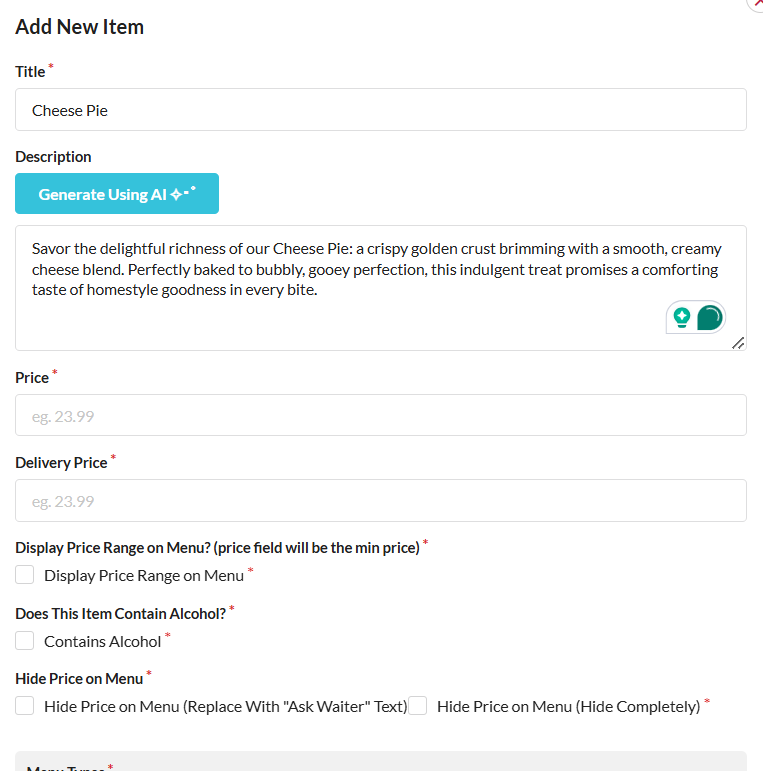
-When you click to add a new item from "Sections", you need to fill all the details for the item such as (Tittle, Description, Price, Delivery Price, other details which are optional); this step should be repeated for all items.
-Tags and menu types should be predefined before creating the Items. Please take a look at steps 4 & 5 for more details.
- Hide Price on Menu:
Two checkboxes are available for each item: - "Hide Price on Menu (Replace With 'Ask Waiter' Text)"
- "Hide Price on Menu (Hide Completely)

Edit an Item
After creating each item, you will have the option to Edit / Delete the item/Mark as Unavailable/Clone.
At this stage, you can also add Descriptors, Modifiers, Allergens, and Tags and include the item in your recommended items. Each of these elements is managed separately in its section; follow Steps 3, 6, and 7 for more details.

The new Item will be shown under the assigned Menu

3. Modifiers
Add new Modifier Group
-A modifier can be added to an item so that the customer can add extras to the item.
-Add new modifier groups and individual modifiers to your menu and manage the availability of each modifier to enhance menu customization.
To Add new modifier, in the Admin Panel, go to the “Menu” tab and press on the button Add New Modifier Group

-Once you click on
Add New Modifier Group, you will get the below list to edit and fill
-Choose a title for the modifier and specify if a minimum and maximum of items must be selected (Select 0 for unlimited)
-Choose the item and click on “Add Modifiers”, more than one modifier can be added per item.

Modifier Group Title

Selection Requirements:
- "Minimum Selections Required: NOT REQUIRED" indicates that selecting a sauce is optional for the customer.
- "Maximum Selections Allowed: 3" suggests that the customer can choose up to three different sauces.

Add new Modifier
-Once you created the modifier group, you can start Edit the group details and add new modifiers, delete modifier group in the group.
-You can Edit, Clone, Mark as Unavailable or Delete each item in this modifier group separately.

The modifiers will be reviewed on the checkout page. If you wish to change their order, you can do so by navigating
to the "Modifiers" option in the Settings section of the admin panel.

-This allows the restaurant to group Menu Sections into a single menu/ distinct menus. For example, if your restaurant has a breakfast menu, and a brunch menu, this two can be shown as different menus.
-You can add new menu types by clicking on "Add New Menu Type" to add more types.


-Once created, you have the option to "Edit" the name of each menu type or "Delete" it.
-After creating it, scroll up to the menu sections and click “Add Menu Type” in the desired sections.

Add new tags to your menu. This will allow you to define custom availability for your menu items and sections, as well as
create discounts for them. You will also be able to filter your orders by a given tag, and only receive notifications for orders
include items with specific tags.

-Click On Add New Tag to create tags then you can configure it in 2 ways:
1. Tag Availability - Allow certain sections or items be made available on certain days and/or times.
2. Time Based Discounts - Allow certain sections or items have discounts on certain days and/or times.
On the “Enable Tag Availability”, set the availability by days of the week and times and make sure you click on “Update Tag Availability”.

On the “Enable Time Based Discounts”, set the % based discounts and make available on the days of the week and times and make sure you click on “Update Tag Discount”.
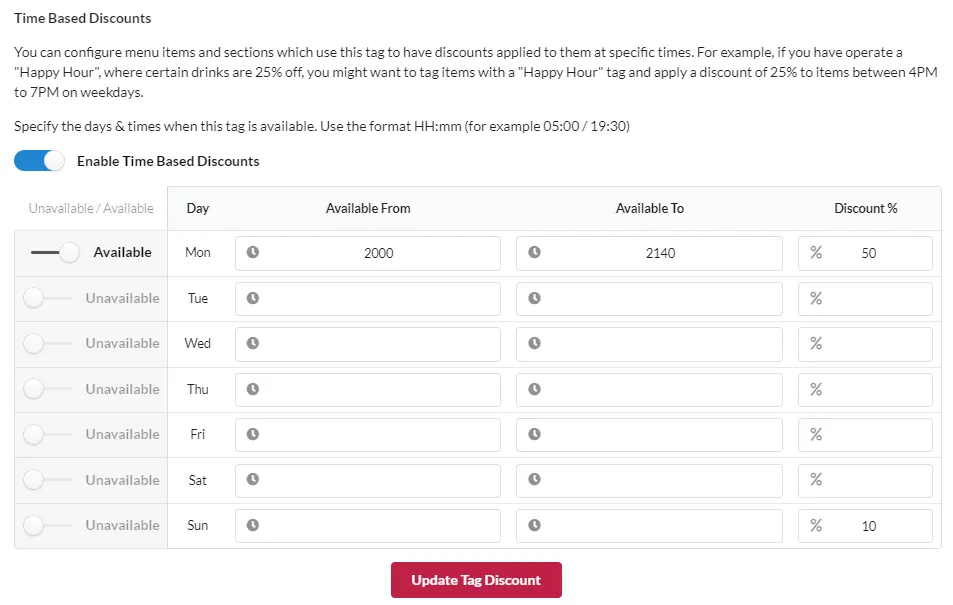
-For your Tags to be displayed, you need to allocate it to items when creating sections and adding items
to the menu by clicking on ADD TAG in the menu section creation in order to choose the defined tags.

6. Allergens
An allergen can be added to an item so that the customer can be warned before ordering it.
-In this section, you can add new allergens to your menu by going to the Admin Panel, “Menu” tab and press on the button “Add New Allergen

There is also a predefined list with the most popular allergens. If the allergen is on this list, instead of creating a new allergen, click the button “Add”.
Use the "Add" button next to each suggested allergen to include them in your allergen list
-Once added, you can assign these allergens to specific menu items to inform customers about potential allergens
A descriptor can be added to an item so that the customer can be warned before ordering it.
-Add new descriptors to your menu to inform customers about specific attributes of menu items, such as whether they are halal,
kosher, or gluten-free. These descriptors can be assigned to relevant items to provide additional information.
-Click on "Add New Descriptor"

For your descriptor be displayed on a specific item, you need to allocate it to items when creating sections and adding items
to the menu.
To further customize and edit your menu, in your admin panel go to Settings > General Information, where you can access the following options:
Restaurant / Hotel Image: Upload an image representing your restaurant or hotel.
Color and Font Settings: Customize primary and secondary colors to align the checkout page with your brand.
Call To Action Text: Add text to prompt specific actions, such as informing customers of surcharges or encouraging them to place an order.
Bottom of Menu Text: Include optional text at the bottom of the menu for additional information like surcharges, allergens, or service charges.
Menu Banner: Display a banner with your promotional offer on the menu.
Modifier Settings: Control the visibility of modifier items on the menu; choose to display them only at checkout or directly on the menu.
Recommended Items: Show recommended items either directly on the menu or only when customers proceed to checkout.
Menu Styling and Fonts: Enable Infinite Scroll to continuously display all menu items as users scroll, enhancing browsing.
Menu Sorting: organize menu items by price, alphabetically, or by a custom order you define
Welcome Screen: Add a welcome screen with a customizable message, logo, and language selection, which displays before customers see the menu.
Menu Popup: Show a popup a few seconds after the menu loads, ideal for collecting emails or displaying promotions.
Promo Banner: Display a recurring promotional banner on the menu for ongoing offers.
User Actions: Add menu options for customers to request service actions, such as calling a waiter or requesting the bill.
For full details, refer to the Account's Operations and Configuration article directly through this link.


