PayTabs plugins make the integration with the PayTabs payment gateway very easy by providing a ready-made and easy-to-install plugin that enables you to be ready and go with a few steps, to get you up and running with your business.
In this article, we will walk you through how to configure this plugin with the minimal needed/mandatory configurations to be able to accept payments within your business via PayTabs. Kindly follow the below steps:
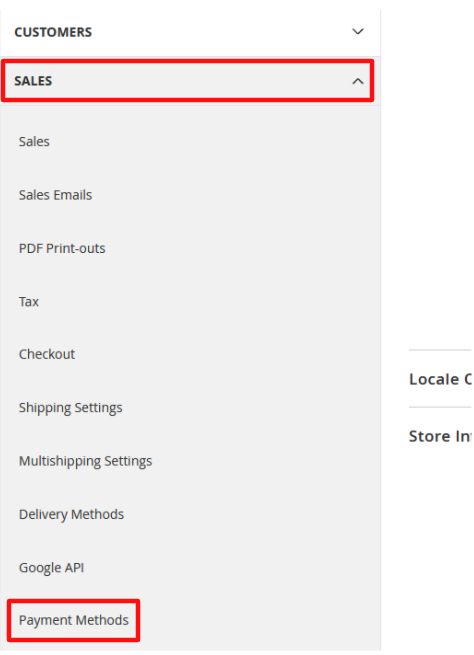
1. From your Magento admin panel, Navigate to the Stores menu, then select the Configurations menu item.

2. In the "Configurations" page, and from the “Sales” tab, select the "Payment Methods" menu item.
3. Expand the preferred payment method from the provided list by PayTabs of the supported payment methods available.

4. The highlighted configuration options shown below are the mandatory configurations needed to be set to start accepting payments via PayTabs.

- Enabled the payment method
In case you want to enable/disable the payment method on the checkout page for your customers.
Choosing the "Yes" option leads to displaying this payment method on your website/store checkout page as shown below.
But if you choose "No" as an option, this payment method will NOT be displayed/available on your website/store checkout page as shown below.
- Select Endpoint region
This option allows you to choose your PayTabs account's region, in which your PayTabs merchant account is registered/created at. To know more about how to get such information please check our What is my (Region)/(endpoint URL)? solution article.
- Profile ID
Here, you will be obligated to provide your Profile ID correctly, to know how to get such information check our How to get your account information from PT2 Dashboard? solution article.
Also, you need to differentiate which profile you will use in the integration, for more information about this please check our What is Test Profile vs Live Profile? solution article. - Server Key
In this field, you will have to provide a proper/active "Standard" server key from your API keys that existed in your merchant dashboard. To know more information about this and how to handle those keys please check our How to get my Authentication/Integration/API Keys? solution article.
⌂ To get familiar with the whole process and the other steps, kindly navigate to our "The Magento Plugin Integration Manual" solution article.

⇦ And to navigate to the previous step in the integration process "Step 1 - Setup and activate the integration method" click here.

⇦ And to get familiar with the rest of the steps regarding the current step "Step 2 - Configure the integration method" click here.

⇨ Or you can navigate to the next step in the integration process "Step 3 - Initiating the payment" kindly click here.
Was this article helpful?
That’s Great!
Thank you for your feedback
Sorry! We couldn't be helpful
Thank you for your feedback
Feedback sent
We appreciate your effort and will try to fix the article